Clean MS Azure speech-to-text transcripts
These steps will remove the additional rows which contain speaker and confidence information and split the time stamp from the transcript text. It does not include steps to clean audio transcription errors.
Open Refine makes a copy of your transcript data, it does not use your raw transcript. You can clean the transcript copy, then export the cleaned dataset.
It is helpful to name your transcripts with a convention that includes raw and clean in the file name. You can also set up folders for all the raw and cleaned transcripts. See Reproducible-Research-Things for more.
Upload the transcript file and create a project
Upload the transcript file from your computer.
- Launch OpenRefine. Refresh your OpenRefine basic skills here
- Choose
Create Project - Select
Get data from this Computer. - Select
Choose Filesand browse to select the transcript fileyourfilename.txtfrom the folder it is saved to. - Either click
Openor double-click on the filename to import it into OpenRefine. - Click
Next.
Preview and make changes
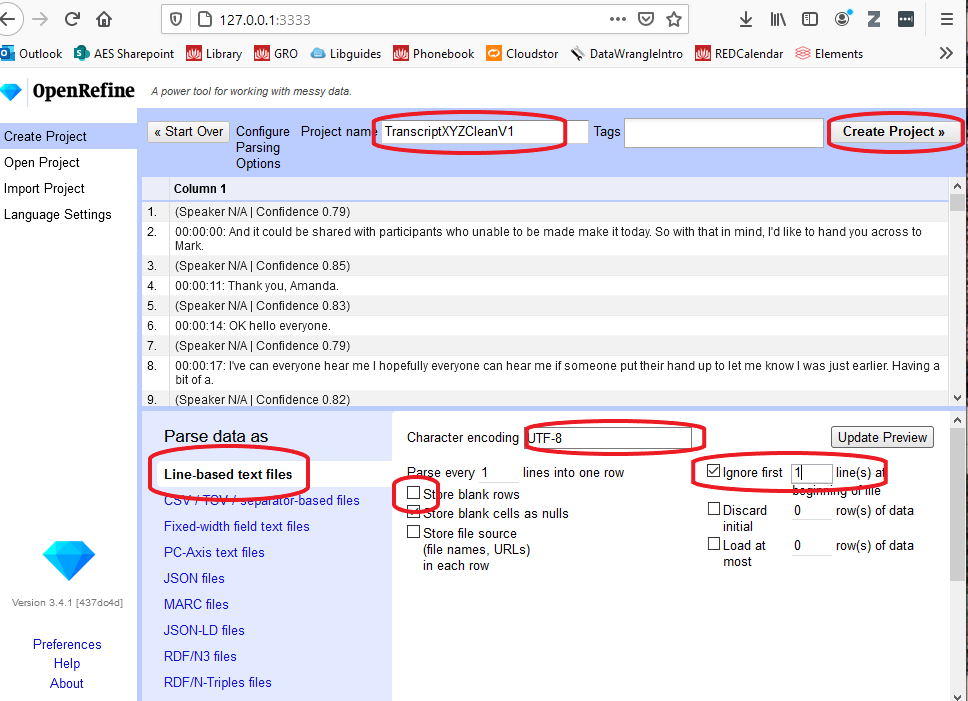
OpenRefine gives you a preview to show you how it has interpreted the file you have uploaded or imported.
The transcript data should be displayed as a Line-based text file.
These next steps will start the cleaning process, then open the project.
- Choose
UTF8as the method of encoding as this should convert any ‘smart’ formatting into plain text. - Uncheck the
Store blank cells as nullsbox. This will remove all the blank rows from the transcript. - Check the
Ignore firstbox add1line(s) at the beginning of file, to remove the first row which contains the total audio duration. - Give the project a meaningful name such as
TranscriptXYZCleanV1 - If all looks fine, click
Create Project.

Option One - for transcripts that don't need to tag different speakers
This option will remove every row that contains Speaker and Confidence information and move the time stamp into a separate column or remove altogether.
- Go to
Column 1 - Click down arrow, choose
Facet > Custom Text Facet - In Expression box, type
value.contains("| Confidence"). True & false results will display in Facet box. - Select and include
trueresults - Go to
Allcolumn, selectEdit rows > Remove matching rows. Results now how only the transcript text lines.
Move time stamp into separate column.
- Go to
Column 1 - Click down arrow, choose
Edit Column > Split into several columns. Notice the time stamps all end in a separator with a space after:. - Tick
by separator - At
Separator boxenter colon with a space after:. N.B. The space is important, as there are other colons in the timestamp without spaces after. - Ok
You can now either remove the time stamp column or rename each column. To rename:
- Go to
Column 1 1(time stamp column) Edit column > Rename this column- Enter new colun name ie. Time stamp
- Repeat for
Column 1 2
To remove the column:
- Go to
Column 1 1(time stamp column) Edit column > Remove this column
To export results:
- Go to
Exportbutton and export results in required format. - Select
Comma-separated value (.csv)file format for structured data in columns. The file will save with theproject nameinto yourDownloadsfolder.
or
tab-separated value (.tsv)format- Select
open with Notepad - Select
File > Save As > .txt
Option Two - for transcripts that need retain speaker tags
This option will retain each individual speaker tag, rename them, and remove the confidence rating and time stamp information.
- Go to
Column 1 - Select
Text filter - Enter speaker name ie.
Speaker 1 |. Results will display rows containing this text. - Go to
Column 1 Edit cells > Transform- In Expression box, delete
valueand enter the speaker details within quotation marks ie."Interviewer: "or"John: "or using a de-identified ID number ie."ID 27456"which is documented securely elsewhere. - Ok
- Repeat these steps for each Speaker in the transcript.
Remove time stamps
- Go to
Column 1. Notice the time stamps all end in a separator with a space after:. Edit cells > Split mulit-value cells- Tick
by separator - At
Separator boxenter colon with a space after:. N.B. The space is important, as there are other colons in the timestamp without spaces after. - Ok. New rows are displayed containing the time stamps.
- Go to
Column 1 Text filter- Tick
regular expressionbox and type:\d\d\W\d\d\W\d\d(you can copy and paste this into the box). This identifies and filters by the format of the time stamp ie. 00:10:23 as digit, digit, non-word character, digit, digit, non-word character, digit, digit. - Select
AllColumn Edit rows > remove matching rows- Close Facet box
- Results will display transcript text without time stamps.
Note: Different analysis software may require different formats for speaker tags.
Leximancer - Speaker names start with a capital letter on a new line, followed with a colon and a space, eg: Alan: . Source Leximancer Manual
NVIVO -The speaker name must appear at the start of a line. It cannot be proceeded by any characters—including tabs and spaces. The speaker name can appear on the same line with the response or on a separate line above the response—as long as it is at the start of a line. Source: Using NVIVO